
What is this about?
A substantial number of web applications nowadays need its users to upload content for further processing or simply for storage. These can be images, videos, documents or simply text uploads. These uploads eventually end up getting stored on some kind of cloud storage. Amazon Web Service's (AWS) S3 is one of the more popular choices for such cloud storages. This article explains how to perform a secure upload to S3 directly from our browsers.
Uploading files to S3 can be done in one of the following techniques:
- Upload files to our own backend server and from there route the upload to S3
- Directly upload the files to S3 from browser (recommended)
Which technique to choose?
Routing our S3 uploads via our own server has its own advantages and disadvantages. While it gives us better control about how, when and what to upload, it has a very noted disadvantage of putting unnecessary load on our servers which can be avoided by directly uploading from the browser.
Directly uploading to S3 from the browser allows us to keep unnecessary load away from our servers. Also, using AWS Signature Version 4, it allows us to keep our AWS secret key hidden from the browser by using our server to generate the upload parameters.
Direct upload to S3 is almost always the preferred technique.
How does secure upload to S3, directly from the browser, works?
Uploading files to S3 directly from browser is a 5 step process:
- User uploads the file to the browser
- Browser makes an AJAX request to the backend with the uploaded file's information like name, size etc. (not the file itself)
- At the backend, a S3 policy document signed with the AWS' Secret Key alongwith other upload parameters for S3 are generated and sent back to the browser.
- The browser makes an API upload request to S3 with the file alongwith the policy document and upload parameters.
- S3 decrypts the policy document and if its content matches the upload parameters then a successful upload is performed.
Upload to S3 can be done using either HTML forms or simply formdata. I personally prefer using formdatas since they provide a much cleaner approach in case one needs to make several uploads from the browser. But we will be discussing both the methods here since there is only a slight variation between those two methods.
Before starting with any of these steps, we must properly configure our user account and S3 for a secure upload process.
Configuring S3 Bucket and IAM User Account
First we must create an S3 bucket. Lets call it demo-dev. Once created, we must set the CORS (Cross Origin Request Sharing) configuration for our bucket on S3. The preferred method to set the configuration is via the AWS S3 Management Console. Detailed instructions can be found in this CORS documentation.
For greater security, the CORS configuration must be as restrictive as possible while permitting POST requests. Assuming our application's URL to be demo.com, the minimum CORS access needed for this article is:
<?xml version="1.0" encoding="UTF-8"?>
<CORSConfiguration xmlns="http://s3.amazonaws.com/doc/2006-03-01/">
  <CORSRule>
    <AllowedOrigin>demo.com</AllowedOrigin>
    <AllowedMethod>POST</AllowedMethod>
    <AllowedHeader>*</AllowedHeader>
  </CORSRule>
</CORSConfiguration>
Now that the S3 bucket is created and properly configured, we need a user account for which we will generate its accessKey and secretKey from AWS IAM Console. These keys will be used in Step 3 to sign our policy document and in Step 4 to upload the file to S3.
We must never use our root account user to generate Security Credentials (accessKey and secretKey). AWS allows for accounts to have restricted user called IAM(Identity and Access Management) Users. These users can be configured to have only restricted access to AWS resources unlike our root account. We can learn here how to create an IAM user
Once the IAM user is created, we must assign it necessary permissions needed for this article. Permissions to an IAM user can be managed via IAM policy configurations. Instructions on how to configure IAM policies can be found at the hyperlink.
Again, for greater security, one must provide the bare minimum access to an IAM user that is needed. For the purpose of this article, an IAM user will need atleast the following inline policy:
{
  "Version": "2012-10-17",
  "Statement": [
    {
      "Effect": "Allow",
      "Action": [
        "s3:PutObject",
        "s3:PutObjectAcl"
      ],
      "Resource": "arn:aws:s3:::demo-dev/*"
    }
  ]
}
The demo-dev being the name of our S3 bucket. To define actions on multiple resources, the Resource field can be an array. We can also go through these policy document examples to get a better understanding of how to frame policies. We can learn about other policy permissions from here
Once done, we must generate User Credentials for the user and save them for further use. We can learn from here how to create access credentials.
Now that we have properly configured our S3 bucket and our IAM user, lets go through each step one by one.
Step 1: Uploading file to the browser
Uploading file to browser can be achieved simply via an input element of type file:
<input id="file_input" type="file" name="file" />Or, in case we want to use the HTML Forms method, by creating an HTML form:
<form id="myform">
  <input type="hidden" id="key" name="key">
  <input type="hidden" id="acl" name="acl">
  <input type="hidden" id="success_action_status" name="success_action_status">
  <input type="hidden" id="policy" name="policy">
  <input type="hidden" id="x-amz-algorithm" name="x-amz-algorithm">
  <input type="hidden" id="x-amz-credential" name="x-amz-credential">
  <input type="hidden" id="x-amz-date" name="x-amz-date">
  <input type="hidden" id="x-amz-signature" name="x-amz-signature">

  <input id="file_input" type="file" name="file" />
  <input type="submit" name="btn_submit" id="btn_submit">
</form>
Notice that the input element of type file is the last element in the form. This is because while uploading the file to S3 in Step 4, S3's API requires the "file" parameter to be the last parameter. While using the formdata method also, we must append the "file" parameter to the formdata parameters in the end.
Note: The "file" parameter must be the last parameter when sending the upload request to S3
Step 2: Sending AJAX request to node.js to fetch upload parameters
After the file has been uploaded to the browser, we must fetch upload credentials for the file to upload to S3 from our server running on node.js. For node.js to be able to determine the file's MIME type we can either determine it in the browser itself by using the file's byte or for the sake of simplicity we use the file extension. (Note: A file's type need not be the same as mentioned by its extension).
First we must fetch the uploaded file's name from the input element.
var fileInput = document.getElementById('file_input');
var file = fileInput.files[0];
var filename = file.name;
Now send an AJAX request to the server with the filename as parameter.
var getS3UploadCredentialsUrl = '/getS3UploadCredentials';
var xhr = new XMLHttpRequest();
xhr.onreadystatechange = function() {
  if (xhr.readyState == 4 && xhr.status == 200) {
    var response = xhr.responseText;
    response = JSON.parse(response);
    // handle server response here
  }
};
xhr.open("GET", getS3UploadCredentialsUrl + "?filename=" + filename, true);
xhr.send();
Step 3: Generate signature using the S3 policy document by signing it using AWS secret key
At node.js, we need to reply with the S3 upload url and the upload paremeters to be sent with the S3 upload request.
First lets put all the required information in a configuration object.
var config = {
  bucket: "demo-dev",
  access_key: "XXXXXXXXXXXXXXXXXXXX",
  secret_key: "xxxxxxxxxxxxxxxxxxxxxxxxxxxxxxxxxxxxxxxx",
  region: "xx-xxxxxxxxx-x",
  acl: "public-read",                                                 // to allow the uploaded file to be publicly accessible. Can also be set to "private"
  "x-amz-algorithm": "AWS4-HMAC-SHA256",                              // algorithm used for signing the policy document
  success_action_status: "201"                                        // to return an XML object to the browser detailing the file state
};
We can generate the S3 upload url from the bucket name itself.
var upload_url = "https://" + config.bucket + ".s3.amazonaws.com";Next we need to create an upload policy object for the file upload and encode it to a base64 string.
var date = new Date().toISOString();

// create date string for the current date
var dateString = date.substr(0, 4) + date.substr(5, 2) + date.substr(8, 2);

// create upload credentials
var credential = config.access_key + "/" + dateString + "/" + config.region + "/s3/aws4_request";

// create policy
var policy = {
  expiration: new Date((new Date).getTime() + (1 * 60 * 1000)).toISOString(),         // to set the time after which upload will no longer be allowed using this policy
  conditions: [
    { bucket: config.bucket },
    { key: filename },                                          // filename with which the uploaded file will be saved on s3
    { acl: config.acl },
    { success_action_status: config.success_action_status },
    ["content-length-range", 0, 1000000],                       // optional: to specify the minimum and maximum upload limit
    { "x-amz-algorithm": config["x-amz-algorithm"] },
    { "x-amz-credential": credential },
    { "x-amz-date": dateString + "T000000Z" }
  ]
};

// base64 encode policy
var policyBase64 = new Buffer(JSON.stringify(policy)).toString('base64');
Details about various keys included in the policy object can be found at this link.
Once we have the encoded policy document, we need to generate a signing key. This key will used to sign the encoded policy document to generate the final signature which will be used for the upload.
The following diagram illustrates the general process of computing a signature.
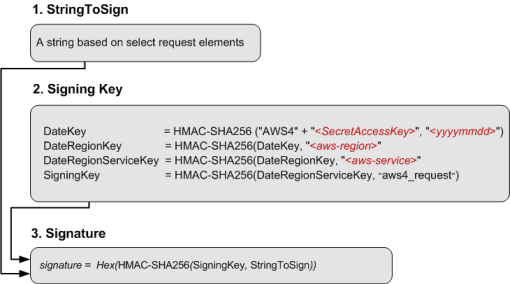
In the above image, the encoded policy document will be the "StringToSign". The encryption process can be performed using the node.js's inbuild package crypto.
var crypto = require("crypto");

// create signature with policy, aws secret key & other scope information
var dateKey = createHmacDigest("AWS4" + config.secret_key, dateString);
var dateRegionKey = createHmacDigest(dateKey, config.region);
var dateRegionServiceKey = createHmacDigest(dateRegionKey, "s3");
var signingKey = createHmacDigest(dateRegionServiceKey, "aws4_request");

// sign policy document with the signing key to generate upload signature
var xAmzSignature = createHmacDigest(signingKey, policyBase64).toString("hex");
Now with all the necessary upload parameters generated, we can return the following necessary upload parameters to the browser for Step 4.
{
  key: filename,
  acl: config.acl,
  success_action_status: config.success_action_status,
  policy: policyBase64,
  "x-amz-algorithm": config["x-amz-algorithm"],
  "x-amz-credential": credential,
  "x-amz-date": dateString + "T000000Z",
  "x-amz-signature": xAmzSignature
}
Step 4: Upload file to S3 with upload parameters
Now that we have all the necessary parameters, it is time to send an upload POST request to S3 alongwith the file and at upload parameters. This can be done in two ways as discussed in Step 1. We can use HTML forms to collate all the parameters in a formdata object and submit the form to send the POST request to necessary S3 url. Or we can create our own formdata object using javascript, append necessary parameters to it in the order we want and send the request. Let's look at both the methods.
While using HTML Forms method recall the HTML form element we created in Step 1. Now that we have all the parameters we first need to add values of those parameters to the form elements and then send the extracted formdata object of the form to S3.
// response is the JSON response object containing the upload parameters
document.getElementById("key").value = response.params.key;
document.getElementById("acl").value = response.params.acl;
document.getElementById("success_action_status").value = response.params.success_action_status;
document.getElementById("policy").value = response.params.policy;
document.getElementById("x-amz-algorithm").value = response.params["x-amz-algorithm"];
document.getElementById("x-amz-credential").value = response.params["x-amz-credential"];
document.getElementById("x-amz-date").value = response.params["x-amz-date"];
document.getElementById("x-amz-signature").value = response.params["x-amz-signature"];

var form = document.getElementById("myform");
var formData = new FormData(form);

var xhr = new XMLHttpRequest();
xhr.onreadystatechange = function() {
  if (xhr.readyState == 4) {
    var responseDoc = xhr.responseXML;
    // read response here
  }
};
xhr.open('POST', response.upload_url, true);
xhr.send(formData);
We can login into our S3 Management Console and see the uploaded file listed in the required bucket.
While using the independent formdata method, we need to create a new formdata object and append parameters to it before uploading it to S3.
var formData = new FormData();

// response is the JSON response object containing the upload parameters
formData.append('key', response.params.key);
formData.append('acl', response.params.acl);
formData.append('success_action_status', response.params.success_action_status);
formData.append('policy', response.params.policy);
formData.append('x-amz-algorithm', response.params["x-amz-algorithm"]);
formData.append('x-amz-credential', response.params["x-amz-credential"]);
formData.append('x-amz-date', response.params["x-amz-date"]);
formData.append('x-amz-signature', response.params["x-amz-signature"]);

var fileInput = document.getElementById('file_input');
var file = fileInput.files[0];
formData.append('file', file);

var xhr = new XMLHttpRequest();
xhr.onreadystatechange = function() {
  if (xhr.readyState == 4) {
    var responseDoc = xhr.responseXML;
    // read response here
  }
};
xhr.open('POST', response.upload_url, true);
xhr.send(formData);
Notice that file parameter is appended to the formdata object in the end. Because as explained in Step 1, S3 requires the file parameter to be the last parameter of the request object.
Note: The "file" parameter must be the last parameter when sending the upload request to S3
Step 5: S3 request authentication and response
On S3 the request is first authenticated to check for any man in the middle attacks. Since the policy document is signed with the user's secret key, it can be safely assumed that it wasn't tampered with. S3 decrypts the policy document using the same secret key and matches its content with other upload parameters. If the parameters match then the file is successfully uploaded to S3.
After upload, S3 replies back to the request based on the parameters. Since our success_action_status parameters has a value of 201, Amazon S3 returns an XML document with a 201 status code. Other response code values can be found here.
<?xml version="1.0" encoding="UTF-8"?>
<PostResponse>
  <Location>https://demo-dev.s3.amazonaws.com/{filename}</Location>
  <Bucket>demo-dev</Bucket>
  <Key>{filename}</Key>
  <ETag>"xxxxxxxxxxxxxxxxxxxxxxxxxxxxxxxx"</ETag>
</PostResponse>
Example
A working example code for the article can be found in my github repository: surenderthakran/s3-browser-upload-demo